The Planer
“Shop Safety Series”

Such a simple machine but it still causes some grief for my Carpentry I students. Why? Because it involves remembering steps in a certain order and concepts that they’re not familiar with. By the time they reach Carpentry II, they’re usually pretty good about it. Let’s explore.
** Note. This is the way that I was taught and you might have a difference of opinion on how to teach it.
** Another note. If I have boards that are pretty flat for my level I projects, I skip the jointer and process them through the planer. This is not ideal for fine furniture making.
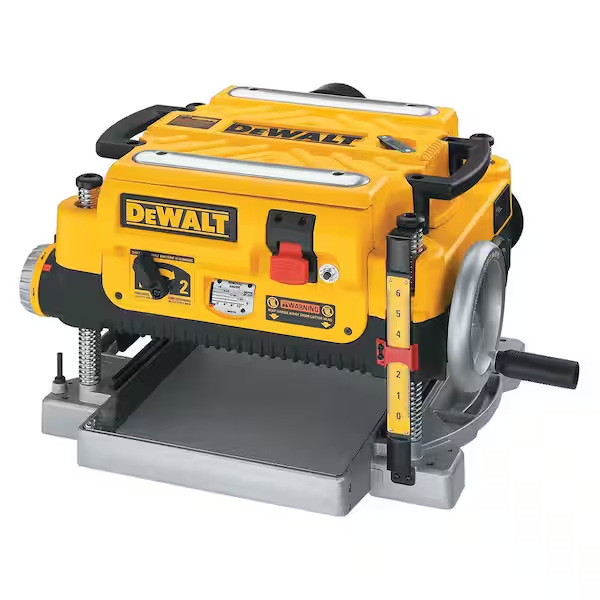
Like our other tools, I make the students draw and label the major parts of the planer.
I share with them that the objective of the planer is to reduce a board’s thickness to a desired measurement. In conjunction with a jointer, it’ll also produce two parallel faces.
We discuss the following safety precautions for beginners:
Don’t stick our hands in the planer.
Don’t put in boards that are shorter than the width of the planer. (I know that the operating manual allows for much shorter pieces but I set a standard so I don’t have students putting in pieces that are too short or putting their hands in the planer to retrieve short pieces that might get stuck.)
PPE. No loose clothing and earmuffs should be worn due to the loud noise.
The operation of it.
It may sound dangerous, but I ignore the scale on the side of the planer.
With the machine OFF, I instruct my students that the first step in operating the planer is to drop the table (or raise the machine head depending on the style of planer) so that there’s plenty of space for a board to slide in and not contact the rollers or anti-kickback fingers.
I next instruct them to slide a board into the planer about mid-way. If we’ve jointed the board, the flat face is down on the table since it’s a reference point.
Turn the machine ON (this freaks them out a bit).
Rotate the height adjustment handle, raising the table (or lowering the machine head) until the rollers engage with the board and start to move the board.
The planer is now set.
** Note. If I have a pile of boards, I would pick the thickest board to set up the planer.
Depending on the machine, I instruct my students to not rotate the height adjustment handle more than ½ turn for our DeWalt 735 planer or not more than one full turn on our Powermatic.
Rotate the handle.
Put the board(s) through, supporting the end until it gets about half way. Support it as it comes out the back side.
Rotate the handle and repeat until the desired thickness is achieved.
Some things to think about.
After both sides of the board become flat, I have my students flip them after every pass. I try to take off an even amount from both sides to prevent the boards from bowing.
Why can’t you skip the jointer and make a flat board with parallel faces? Because, the shortness of the planer table and the rollers moving the board through the machine, a bowed or curved board can go through. The jointer establishes a flat face that the planer then can use as a reference.
The rollers will also push a cupped board flat, plane it, and then when it comes out, it’ll spring back to being cupped. (Naive and young Mr. Stinson thought that it would make it flat… )
Keep the table waxed (or whatever you might use) to help boards slide through without sticking (especially wood with sap).
The end grain debate. I instruct my students to not do it with our machines. Yes, I know there are people out there that have done it successfully but I can’t have students doing it without careful consideration. Educate yourself on it and make your own decision.
The next level.
It might cause some tear-out while planing around a knot. Pay attention to the grain direction and don’t be afraid of turning the board around, changing the planing direction. I’ll also take lighter cuts.
Using a sled with a planer instead of a jointer. Haven’t done it myself but I’ve seen it.
Using a sled to help plane down a board super thin. Yes, I’ve done that. Be careful of the wood fibers breaking instead of cutting.
Can you plane the edges of boards? Yes, I’ll stack a few together and run them through. My concern is with narrow boards tipping over.
This is not a cheap machine and for someone who usually uses boards that are already milled to size, it might not be needed. We buy very little milled boards so we use it quite a lot in our shop at school. Plus, the students enjoy having a variety of board thickness for their projects.
I enjoy having it for my type of work because it expedites processing material for my chairs. I’m not afraid to spend some time behind a hand plane but I would rather not spend all day reducing 8/4+ stock to 1 ¾”.
Let me know if I’ve missed anything.
Really apreciate the teaching approach of ignoring the scale and having students feel when the rollers engage. That tactile feedback builds better intuition than just reading numbers ever could. I ran into the cupped board issue myself years back thinking the planer would fix everything, learned the hard way why the jointer step matters first. The point about flipping boards after every pass to prevent bowing is something I wish someone had told me ealier, would've saved a few pieces.